It’s the simple things in life: One of the best workflow changes I made for Loose Leaf was to use git to manage the version number of my app. To release a new version, just add a tag in git, and the version in my app’s Info.plist would automatically update to match. There’s a number of different ways to set something like this up, and I’ve pieced my particular strategy together from various Stack Overflow posts, and I thought it’d be helpful to put an end-to-end post together to describes the how and why in 1 place.
Long and Short Versions
There are two version string’s you’ll need to specify in your Info.plist: the Bundle Version and the Short Bundle Version. Despite their similar name, these two version numbers can be used for different things. They let you specify two different version numbers for two different uses:
- Short Bundle Version: This is the version number your users see and care about. “1.0” or “2.0” etc
- Bundle Version: This is the version number for you as a developer to care about. It’ll tell you exactly which git commit it was built from.
This post is going to show you how to use git tags to automatically
Step 1: Defining the Bundle Version
To create a new version of the app, simply add a git tag with the appropriate version number:
$ git tag -a -m "a new release" 1.0.0
That’s it! Now that we’ve saved our version info into git, we need a way at build time to ask git which tag we’re currently working on. To retrieve our most recent tag info, we can simply use:
$ git describe
This gets us pretty close – If we’re currently on the exact commit of that tag, then we’ll see “1.0.0” printed to the command line, but if we’re on a subsequent commit, we’ll see something like “1.0.0-24-g89ea736”. Let’s parse out just the version prefix:
$ git describe --tags | awk '{split($0,a,"-"); print a[1]}'
Perfect! that command will ask git for the tagged description, then parse out the prefix before the first “-“. In our case, that’ll print out “1.0.0” for every commit after that 1.0.0 tag.
Step 2: Defining the Short Bundle Version
The short bundle version should be a monotonically increasing number that specifies exactly which commit was used for a particular build. The command to do that is:
$ git rev-list HEAD | wc -l | tr -d ' '
“git rev-list HEAD” lists out all of the commit hashes from the beginning of our repo until our current commit. “wc -l” counts those commits, and “tr -d ‘ ‘” trims the whitespace. Running this command will print out something like “2434”.
Step 3: Automating Your Build
At this point, we have:
- User-facing build number from Step 1
- Developer-facing build number from Step 2
And now we’re ready to automatically update our Info.plist with these two numbers every build.
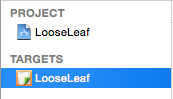
Step 3.1: Open up Xcode and select your target’s Build Phases section
![]()
![]()
Step 3.2: Add a new Run Script phase
Next, we’ll add in the script into our build process to automatically update our Info.plist. Select “Add Run Script Build Phase” from the Editor menu.
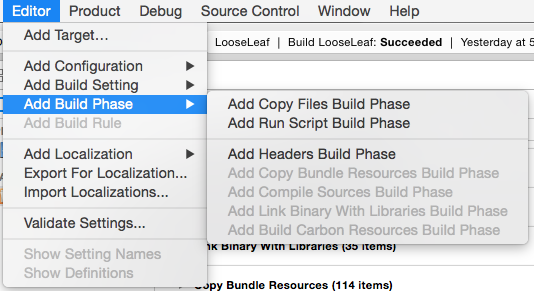
Important: Make sure that your new Run Script phase is after the Copy Bundle Resources phase.
Step 3.3: The Custom Script
Now we’ll use the git commands we found above, and write in their output into the Info.plist. This script modifies the Info.plist in the build target instead of the src directory so that you’re not modifying your source files every time you build.
The script:
# Update the CFBundleShortVersionString in the generated Info.plist using the most recent Git tag.
# Idea taken from http://tinyurl.com/3usjj9d by Joachim Bondo.

# Get the current release description from Git.
GIT_RELEASE_SHORT_VERSION=`git describe --tags | awk '{split($0,a,"-"); print a[1]}'`
GIT_RELEASE_VERSION=`git rev-list HEAD | wc -l | tr -d ' '`

# Set the CFBundleShortVersionString in the generated Info.plist (stripping off the leading "v").
defaults write "${BUILT_PRODUCTS_DIR}/${INFOPLIST_PATH%.*}" "CFBundleShortVersionString" "$GIT_RELEASE_SHORT_VERSION"
defaults write "${BUILT_PRODUCTS_DIR}/${INFOPLIST_PATH%.*}" "CFBundleVersion" "$GIT_RELEASE_VERSION"

touch "${BUILT_PRODUCTS_DIR}/${INFOPLIST_PATH%.*}.plist"
That’s it! Now every time you build your app, the version information will be automatically pulled from your git tags. Easy!
Step 3.4: Rename the Script (optional)
I have a number of different build scripts – everything from this version modification to Crashlytics scripts – and it’s nice to be able to see at a glance which script does what. To change the name of the Build Phase, just double click on it’s title to select it, then type in a descriptive name.

Step 4: Bonus Step – Add Version to Settings.bundle
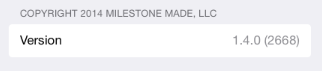
In Loose Leaf, I’ve also added the full version string to the Settings bundle. This helps particularly during QA; it’s much easier for testers to check the app settings to report bugs for a specific version. Even with just a few testers and a few bug-fix builds, it’s nice to be able to quickly verify that someone’s on a particular build when testing.
The end result of this step is a additional field in your Settings bundle that displays the full version string for that build.
To achieve this, first add in a title field into the Root.plist of your Settings bundle. After your done it should look like this:

The default value can be anything (it’s set as “0.1” here), but our script will update it at build time. Also note in this example I’ve added it as Item 4. It maybe a different index in your plist, so make note of that number, we’ll use it again soon. For our example, I’ll be using “4”.
Next, add another Run Script Phase, and copy in the following script:
GIT_RELEASE_SHORT_VERSION=`git describe --tags | awk '{split($0,a,"-"); print a[1]}'`
GIT_RELEASE_VERSION=`git rev-list HEAD | wc -l | tr -d ' '`
VERSION_FOR_SETTINGS="${GIT_RELEASE_SHORT_VERSION} (${GIT_RELEASE_VERSION})"

/usr/libexec/PlistBuddy "$CONFIGURATION_BUILD_DIR/$CONTENTS_FOLDER_PATH/Settings.bundle/Root.plist" -c "set PreferenceSpecifiers:4:DefaultValue $VERSION_FOR_SETTINGS"
In the above script, it specifies “PreferenceSpecifiers:4:…”. If you’re item in the Root plist is a different index, make sure to use that number here too.
Step 5: Enjoy!
Now it’s easy to automatically manage your version numbers for every build. Don’t worry about forgetting to update your Info.plist – everything is taken care of automatically with this simple script!