I’m quite excited to have successfully migrated my blog from 2 WordPress blogs to just 1 WordPress MU install. I had initially set up 2 blogs running on one code-base using WP-Hive, and while I’m really impressed with the hive plugin, it’s always felt more like a hack than a true trustable upgradable solution.
My weekend began with, “Migrating from WordPress to MU can’t be that hard, can it?!” Boy, was I in for a surprise. I hope this brief post will spare you the pain I went through.
1. Download and Install
First, some good news: the README file does a great job walking you through the process of getting a blank MU install up and running. The default installation process for MU is strikingly similar to the standard WordPress install. A quick unzip of the MU files on your server, a few chmod’s, a fresh mysql database, and everything should be peachy. But that’s the good news, what’s the bad news?
2. Importing Your WordPress Data
Now if you’re like me, you might have noticed the tempting “Import” and “Export” buttons.
![]()
![]()
Don’t touch them! These buttons are nothing more than cleverly designed distractions – little pixel sirens – they are not your solution. With my very modest 5.8 Mb export file, I had one hell of a time getting MU to import the thing.
No matter what settings I tweaked, the import timed out after 60 seconds. I changed WPMU settings, I changed PHP max upload size, max timeout, and max memory settings. I ended up splitting the file into over 30 tiny pieces, and still couldn’t get it imported.
mind. numbing.
In my dedication slash foolishness, I wrestled with it for about 6 hours split over 3 days until I finally had enough. Maybe you’ll want to wrestle with splitting xml files and tweaking random upload settings (or maybe you’re lucky enough for it to just work), but not me. There had to be a better way, and luckily there is.
3. Create a New Blog
Creating a new blog in MU is a super easy process, just click ![]()
![]() then the
then the ![]() button. Fill out the form and away you go.
button. Fill out the form and away you go.
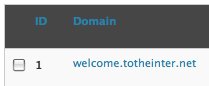
Take special note of the ID that WPMU gives your new blog. The ID is in the left most column of the blogs list.
4. Migrate Your DAta – This Time For Real!
Fire up phpMyAdmin, and take a look at your old blog’s database. You’ll want to export the following tables to a .sql file:
- wp_comments
- wp_links
- wp_postmeta
- wp_posts
- wp_terms
- wp_term_relationships
- wp_term_taxonomy
Remember that ID from step 3? Open up the .sql in your text editor of choice, and globally replace “wp_” with “wp_{ID}_” (where {ID} is your blog’s ID).
 Now point your phpMyAdmin at your WPMU’s database. You’ll notice in this database that you’ll already have tables with names like “wp_1_posts”, etc, so prefix all the tables with your blog ID in them with “old_”. The only table you’ll skip is “wp_1_options”.
Now that you’ve renamed those 7 tables, upload your .sql file into your WPMU database. You should now have a table list that looks something like the image to the right.
5. Fix Author of Posts
Last step! For every author in your old blog (probably just you), create a user in WPMU (if it’s you, it’ll be the MU admin). To assign all the posts to the admin MU user, run the following command in your MU database (substitute {ID} for the blog ID):
[code lang=’sql’ line=’1′]
UPDATE wp_{ID}_posts SET post_author = 1
[/code]
6. Done!
That’s it! You’ll probably want to log into the admin console and re-enable any plugins you need, and tweak your settings again. We omitted the wp_options table, so this process doesn’t import any blog settings at all. I tried importing settings as well, but hit a wall and was plenty happy to manually fix those.
At this very moment I am enjoying 1 admin panel, 1 click install for new blogs, 1 database, and 1 codebase. Simple. Upgradable. Trustable.
Enjoy your WordPress MU powered blog!